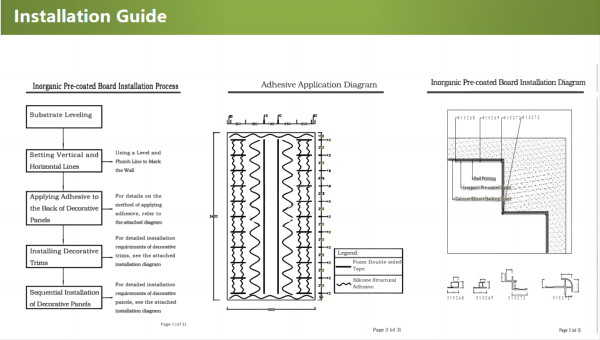
The installation of Magnesium Oxide (MgO) boards is a detailed process that ensures the durability and efficiency of these environmentally friendly construction materials. This guide provides a step-by-step approach to properly installing MgO boards, from substrate leveling to the final touches. Below is an in-depth look at the procedure as depicted in the installation guide.
Step 1: Substrate Leveling
The first essential step in the installation process is substrate leveling. Ensuring a level substrate is crucial for the even installation of MgO boards, preventing future structural issues and enhancing the overall stability of the construction.
Step 2: Setting Vertical and Horizontal Lines
Using a level and plumb line, mark the wall with vertical and horizontal lines. These guidelines are critical for the precise placement of the MgO boards. Ensuring that the lines are straight and level will help maintain the structural integrity and aesthetic appeal of the installation.
Step 3: Applying Adhesive to the Back of MgO Boards
Adhesive application is vital for securing the boards to the wall. The adhesive should be applied in a zigzag pattern across the entire back surface of the MgO boards, as illustrated in the adhesive application diagram. This pattern ensures an even distribution, providing a strong bond between the board and the wall. For detailed instructions on applying adhesive, refer to the attached diagram.
Step 4: Installing Decorative Trims
After applying the adhesive, install the decorative trims. Precision in installing these trims is necessary to enhance the visual appeal and provide a finished look to the MgO board installation. Detailed requirements for installing the decorative trims are available in the attached installation diagram.
Step 5: Sequential Installation of MgO Boards
Finally, install the MgO boards sequentially, following the guide lines set earlier. This step-by-step installation ensures that each board aligns perfectly with the others, creating a cohesive and polished finish.

The installation diagram for MgO boards offers a detailed view of how the boards should be layered and secured. It includes the application of load priming and the placement of the inorganic pre-coated backer. Additionally, the diagram provides various profiles of how the boards should be joined and sealed, ensuring a robust and moisture-resistant installation.

 Home
Home Beiyuan
  May 31,2024
 Detailed Strategies for Preventing Moisture and Sweating Issues in MgO Boards


